Virtual Clamping & Digital Assembly: How Might Software Change Car Manufacturing?
GOM’s 3D metrology hardware has long been involved with the automotive industry, from initial chassis scans through to speed and velocity tests on finished vehicles. Two new features in GOM’s latest software package, Virtual Clamping and Digital Assembly, have the potential to further influence future automotive manufacturing.
In recent years, the demand for more efficient and technologically advanced vehicles has increased and manufacturers have had to take huge leaps to meet the customers’ expectations. GOM has long been involved with the automotive industry. Our 3D metrology systems are used throughout the whole manufacturing process, from the ATOS scanning initial chassis framework all the way through to the ARAMIS SRX conducting speed and velocity door slam tests on finished vehicles. Using these systems means the data capture is much faster than it has been in the past, speeding up the whole manufacturing process. But are automotive manufacturers making the most of that data?
In partnership with our hardware, the GOM Software systems have proved themselves invaluable to automotive manufacture, even in factories which are not using our scanners.
For years the automotive industry has relied on costly and bulky fixtures in order to correctly position parts ready for measurement with tactile or 3D scanning systems. Unstable components such as moulded plastics and sheet metal bodywork needed to be clamped onto a bespoke fixture to ensure the part could be measured in the same position as it’s CAD counterpart. These fixtures are individually made for the specific parts of specific cars, so manufacturers will have hundreds, sometimes thousands of them housed within their factories; costly to produce and taking up valuable space and costing a small fortune. This process also relies on a human element, ensuring each component is clamped in exactly the same way each time while having to do so as quickly as possible to minimise change-over times. Now though, thanks to huge advances in our GOM Inspect Professional software, we can reduce the need for these fixtures, freeing up space and saving costs.
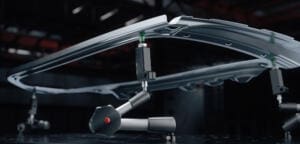
Our revolutionary Virtual Clamping technology was launched in 2019 as part of GOM Inspect with our 2020 version receiving further significant updates. It simulates the clamping of parts and allows the user to compute the clamped state using the data of the real part in its free state. Virtual clamping is a two-step process – firstly, the part is positioned, either on a rotation table or on a universal pneumatic fixture – as there are no clamps, no elements of the part are hidden. These universal fixtures allow the part to balance on the contact points and can be repositioned easily to accommodate any size or shape of part.
The advanced algorithms within the GOM Inspect software detect where the part has been deformed by gravity and reverse the effect, then virtually clamp the 3D scan to simulate its intended position. A full-colour plot is then produced showing the deviations to the CAD model. A report page shows the scanned part in its free state as well as clamped. This method produces exactly the same outcome as a physical fixture but with increased repeatability and less operator influence.
Another recent feature of the GOM Inspect Suite is digital assembly. This is a set of tools within the GOM Inspect software that allows several full 3D scans to be digitally assembled together simulating the physical build. These tools are essential for manufacturers who have different components of one product built in different locations.
The build of a car is a complex collection of assemblies and car body parts. The assembly build condition is critical for many reasons:
- Aesthetic – Good panel fit is integral to quality perception.
- Wind noise – if the matching condition of parts is not correct wind noise issues will be reported.
- Seal crush – problems such as water ingress can be an issue if mating assemblies are not set correctly.
The typical approach to understanding how a car body will build is to use a master jig or cubing fixture (these can cost up to £1million) allowing assemblies to be mounted together to simulate the build of the complete body. “Master” parts can be integrated into the cube to check against, or even actual parts mounted. In many factories, automated production lines can then set gaps for doors, tailgates and boots automatically. This presents an issue with traditional cubing approaches – for example, on car doors, the hinge positions are not set in advance of the assembly because they are set automatically on the production line.
Using complete 3D scans, manufacturers can build a complete virtual car, including setting the gaps between bodywork panels, slotting together moulded plastic headlight assemblies and virtually finessing the build before any physical parts leave the manufacturing facilities. These virtually created set-up values can then be exported to the production sites. Some of the tools can also be used for classic ring gauge applications, creating a virtual ring gauge. This saves the cost of shipping potentially defective components between counties, countries and even continents.
These advances have been developed following years of working within manufacturing. While faster tactile and optical measuring systems are essential, these toolsets within the GOM software take data analysis to the next level, enabling inspection between mating parts before they are in the same location.
For more information about GOM’s suite of 3D measurement software, visit the company website.
GOM UK Ltd
02476 639920
Website
Email


